
Design Sprint: Loops
Building a platform to record and share DIY projects
Design Sprint: Loops
Building a platform to record and share DIY projects

fields: maker scene, project documentation, innovation, online community platforms
methods: user centred design, design sprint
activities: interviews, lightning demos, solution sketches, storyboard, crazy 8’s, prototyping, user testing
tools: pen & paper, invision, photoshop, sketch, usability lab
Overview
This is an experience report about a Google Ventures Design Sprint in a university setting. It presents some of the lessons learned. It does not contain a detailed description of the ‘Design Sprint’ method. Links to relevant resources are provided at the end of this document. Our aim was to create and test a high-fidelity prototype in one week.
The views and lessons learned are my own and do not necessarily reflect those of the other participants.
The Challenge
There is no convenient way to record and share instructions for DIY projects. The challenge was to create on in 5 days using the SPRINT method.
Create a platform — the best open access self-study knowledge platform for any kind of project or topic. – prof. Nebe
Audience
Makers. Anyone interested in remaking or creating instructions for DIY projects.
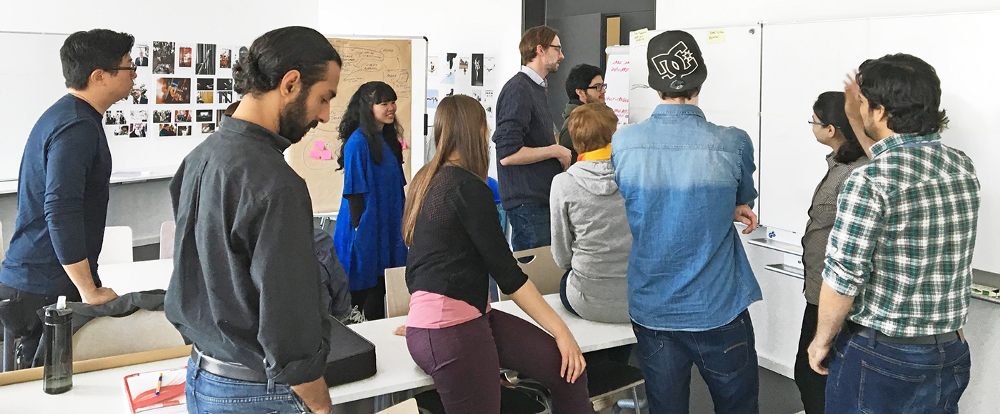
The team
The group working on this project consisted of 12 students and the facilitator, professor Karsten Nebe. I participated in all the design activities and was additionally responsible for copywriting, structuring the prototype and finishing the documentation.

We all learn. All the time. How do we learn? By research, trial and error. Quite often by reproducing/ imitating. We copy and ‘paste’.
People rebuild, remake, rework – Prof. Nebe
The Process
The Design Process was adapted from the Sprint Book. What follows is a breakdown of each day’s activity.
Monday — Setting Goals and Listing Problems
Monday began with an introduction to the topic and the sprint approach. We discussed the idea of creating a platform for making instructions for DIY jobs.

Monday Introduction
In order to come to a common understanding of the long term goals, we put together a list of success and failure factors: The sprint-questions.
Goals and Dangers
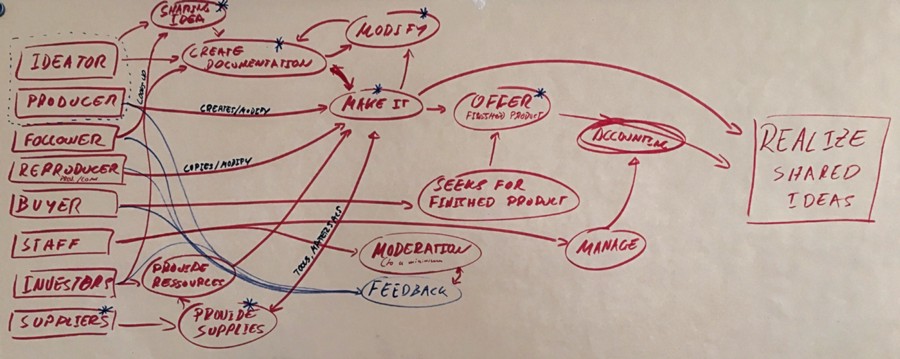
With the long-term goal in mind, we created a map, consisting of the stakeholders, their activities and the core functions of our platform. The map illustrates the relationships between these aspects and represents the core concept.

The Map

Interviews with the experts
We conducted four interviews with experts representing the needs of business stakeholders and typical users. We presented our map and the success and failure factors to the experts. They gave us valuable information on how to improve our concept and which aspects to focus on.

How-Might-We Questions and voting
This information enabled us to set up How-Might-We Questions (HMW) to address the most important challenges. We collected the questions on post-its and sorted them into categories. We voted to identify the most relevant categories and localised these on our map.

Mapping the votes to the map
Worked surprisingly well. Someone shouted out a ‘cluster’s topic’ and all people started collecting notes.
Three core aspects were identified:
- Sharing an idea
- Documenting ideas & projects
- Remaking projects
Each participant chose one of these to work on for the next day. The facilitator picked the most important HMW questions from each category and shared the list with the students.

reminder of most pressing How-Might-We Questions
Monday’s Lessons Learned
- User involvement and feedback at an early stage is essential.
- Our map should have been simpler.
- Interviewees had difficulty understanding the map. Consequently, explaining the map to the users took too long. In future, one should prepare scenarios to illustrate the idea.

TUESDAY — Sketching Day
Tuesday started with the lightning demos. We researched existing solutions that might fit with our project and promoted these ideas in 3-minute demos. The facilitator gathered useful ideas with a quick drawing on the whiteboard:

Lighning Demos, Solution Sketches
The result then was impressive! Nobody had expected that many nice ideas ☺
A quick review by the facilitator showed how well Monday’s HMW notes, long-term-goals, concepts from the Lightning demos fitted together.
Since our map was too complex, we circled back and simplified it. Only stakeholders relevant for the main workflow were kept.

The ideas from the lightning demos were linked to topics on the map and each student picked an area to perform the ‘4 step sketching’ on:
1: notes, 2: ideas, 3: crazy 8’s, 4: solution sketch

Picking an area to ideate on
We reviewed the data and concepts generated up to this point and each person jotted down his or her individual ideas and thoughts as to how best to proceed. This is an element described in the Sprint book, which maintains that group brainstorming is inefficient. Students kept their notes private and highlighted the points they deemed most promising.

Crazy 8's
Eight minutes. Fold a sheet of paper to create eight frames. Hence crazy 8’s. Sketch a variation of one of your best ideas in each frame. Spend one minute per sketch. (p. 111), sprint manual
Each person picked a favourite idea and asked themselves ‘What could be another good way of doing this?’, scribbled these new ideas down in less than a minute and repeated this with the next idea. We used this to iterate on various types of ideas, including elements for interaction, navigation, wording and work flow diagrams. As with the notes, the crazy 8’s were kept private. — On to the solution sketch!
Solution Sketch Rules

Solution Sketch Rules
Solution Sketch Results


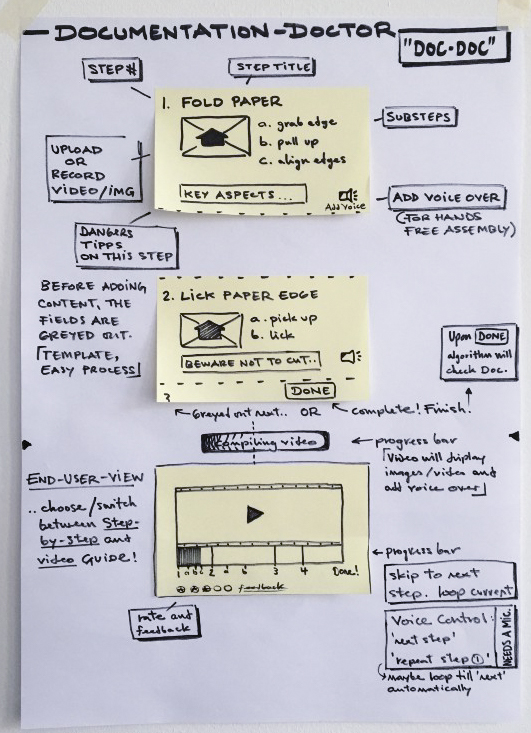
The Doc-Doc was my Solution Sketch
Tuesday’s Lessons Learned
- Crazy 8’s are useful and fun
- I am unashamedly good at synthesising ideas

Art Museum
WEDNESDAY — Decisions, Decisions!
Day 3 started off with an “Art Museum” of the solution sketches. We selected the features to be included in the prototype by voting in heat map fashion.

The speed critique involved a round of three minute sessions criticising each sketch on its compatibility with the long term goal.
"Lets find the million dollar idea."

Narrowing it down
A straw poll was conducted and the facilitator cast his super votes. This separated the ‘Winning Ideas’ from the ‘Maybe Laters’. My Doc-Doc was a winner.
It’s important that everybody understand the limits of the design space. Otherwise discussions might go on and on.

Final Clusters
“Don’t call it winners — it implicates that there are losers.”
We concentrated on two major concepts: Everybody Can and Power of Us.

To main fields of interest
Discussing what to include in the storyboard for prototyping
We split up into two groups. One sketched the Everybody Can prototype on a whiteboard. It focused on the workflow from the landing page to the project creation process. Sketching on the whiteboard made it easier for everyone to participate and present their views on the prototype as well as to make quick changes.

Everybody Can Storyboard — first attempt at creating an easy, guided documentation process
The other group sketched the The Power of Us prototype. It dealt with the project creation workflow and focused on community aspects.

The Power of Us Storyboard — The community aspects
After finishing the two prototype threads, they were put together to form a storyboard.
Wednesday’s Lessons Learned
- Getting everybody to concentrate on the main goal was challenging
- Separating the themes Everybody Can and the Power of Us was a mistake
- The names of the project threads were too abstract to convey concrete ideas
- The power of us distracted people from the main goal. It should have been left out. Its inclusion made the work on this day exhausting
- We should perhaps have been more rigid in keeping the scope manageable.
At this stage we ran into problems resulting from poor group dynamics. There was difficulty reaching a consensus the amount of detail required to draw a good storyboard. The facilitator suggested that we make a set of sticky notes, each one corresponding to a step in the workflow. A time-limit was set for this exercise, but unfortunately some students got bogged down discussing details.
Maybe the size of the team was just too big. We therefore split into two unequally sized teams, one with 7 members, the other with 3. But here again the larger team split internally with two of us sketching and the others discussing issues not relevant at all to the Sprint project.
The facilitator managed to change this situation and focus the group again by creating an imaginative game. The idea was to have us simulate a miniature DIY job. One student, it happened to be me, was given the task of making a paper aeroplane and documenting how to make it. Using a mobile phone I filmed the procedure and spoke descriptions of the various steps as I went along.
A second student who had not witnessed this was then given the video and asked to use the instructions to fold an aeroplane similar to the one I had made. Which he successfully did.

The exercise had made clear to everyone what level of detail was required for DIY instructions. It also defined how a storyboard for our purposes should look. The most significant take home lesson, however, was the realisation that the goal must to be kept in mind during the whole process. I mentioned that it made sense, right at the beginning, for the team to agree on the scope of the final product.
Following this highly productive interlude we managed in just a few minutes to create a high level structure for the workflow together with a list of elements still missing.

Prototyping
THURSDAY — Prototyping and Test Preparations
The next phase was to bring the sketched prototype to life. We distributed tasks according to individual skills. The roles of makers, stitchers, writer, asset collectors and interviewers were assigned. We created a high-fidelity prototype based on the two storyboards.


While some of the makers decided on the layout grid, the asset collector chose a UI kit and a colour scheme. During this phase we realised that it would be better to unite the storyboards.


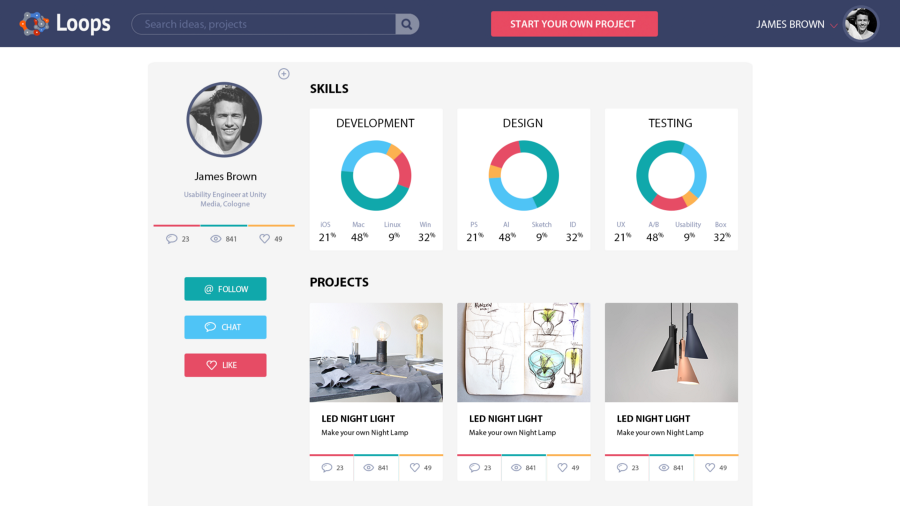
We called the platform ‘Loops’ and the asset collectors quickly came up with a logo. The name reflects the potential of the product to be used as a tool for generating variations of existing projects on the platform.
I, as the writer, worked on the copy and created an ad. We placed the ad in a magazine and used it to introduce our platform to test participants on the following day.
You can find the clickable prototype of Loops here.

Imaginary ad built for introducing our idea to test participants
We called the platform ‘Loops’ and the asset collectors quickly came up with a logo. The name reflects the potential of the product to be used as a tool for generating variations of existing projects on the platform.
I, as the writer, worked on the copy and created an ad. We placed the ad in a magazine and used it to introduce our platform to test participants on the following day.
You can find the clickable prototype of Loops here.
Setting up the Test
The three interviewers got busy preparing the usability lab and scripting the test. They set up the technical lab infrastructure and wrote an agenda, an introduction, a storyline and a follow-up questionnaire.

Thursday’s Lesson Learned
- It helps to have Photoshop and Sketch experts on your team
- Parts of the prototype got changed around before the test. ‘Freezing’ the prototype is super important. In our case UI elements that were not part of the storyboard were added over night and led to some confusion on…
FRIDAY — Test Day
Interviews & Analysis
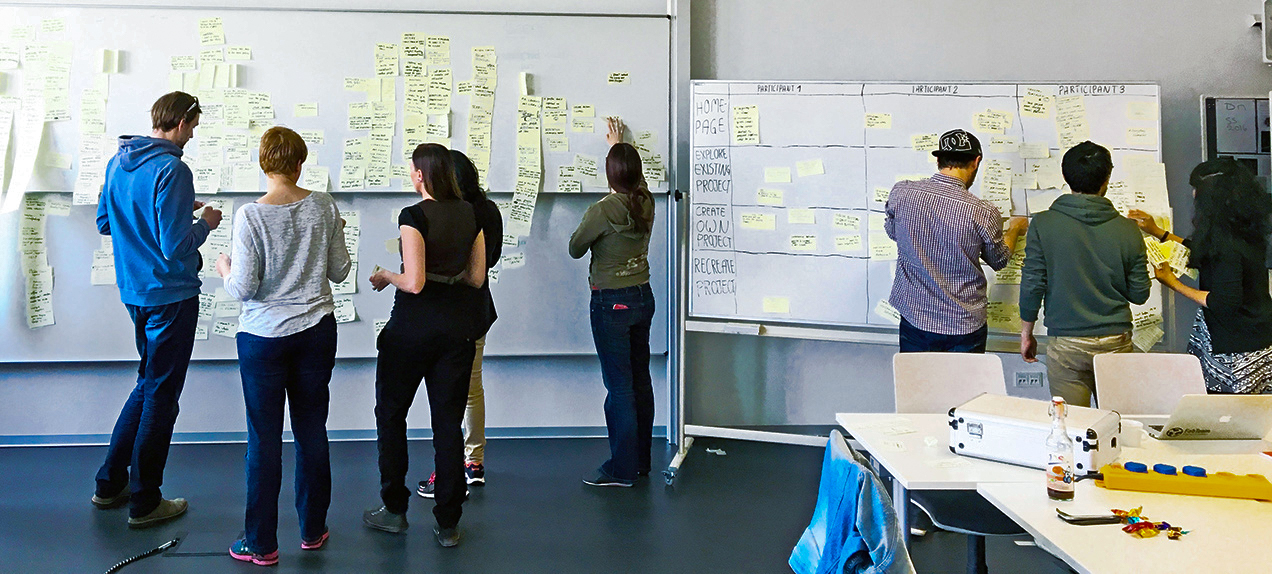
The test setup consisted of an interview room and an observation room. Our magazine ad was given to the interviewees as an introduction to the product. They were then asked them to use the prototype and encouraged to think out loud and give candid feedback. We observed the test participants through a one way mirror and followed their interactions with the prototype via video. The sprint team collected notes and observations on a whiteboard.

A quick round of sorting the notes helped in drawing conclusions and defining priorities. Using a voting method we identified the best features of the prototype and the parts still needing improvement.
A quick round of sorting the notes helped in drawing conclusions and defining priorities. Using a voting method we identified the best features of the prototype and the parts still needing improvement.

Friday learnings & Wrap up
Following a recap of Fridays test sessions we gathered for a final wrap up. People made a list of their personal top 3 aspects for the platform. The overall three core aspects were:
- Take the Pain out of Documentation — this really is the root of the problem
- Make Re-creation a Breeze — with detailed requirements, instructions and supplier integration…
- Engagement by Rewards — building a strong community, implementing a licensing system and using elements of gamification to keep users engaged.
We didn’t need Investors as stakeholders in our map, but after this week we ourselves might be looking for investors…
Retrospective
The scope of the project was too big. Time spent thinking about community aspects of the platform would have been better spent concentrating on how to improve the documentation process. This approach would have lead to a better prototype. Testing Community features with only three users in a single day was in my opinion insufficient.
[the challenge was formulated in way that restricts the solution space to what might only be a part of the solution, namely a platform. both too narrow and too broadly. focussing more on finding and getting right the one critical aspect, the one that is the missing link, the innovation, in this case: how to make recording a DIY process really easy, so people have a way to document and share their process in an easy and fun way — Taking the Pain out of Documentation as it was later called out. We didn’t even let them record a building process in the final test. we should have interviewed them at the place where they work. they just used the prototype and answered questions about the community aspects and the recreation aspect of the platform. which are also important, and we did learn something, but it was not going in the direction of the key innovation space. It leaves open that there could be hardware involved in the solution. In this sense the Challenge is too narrow: it gives boundaries on how to solve the problem by restricting thinking to a platform, which is part of the solution, but not of the problem. The problem might well need some extra hardware to be adequately solved.]
After the project had come to an end, I realised how much more fun it had been than the one we did in the first semester. I interviewed my fellow students on their feelings about the projects. To illustrate the differences I made two sketches. This is what the first semester project felt like for many students:

Now compare this to the sprint week:
